
The term “sacred geometry” has become commonplace in New Age culture. According to Wikipedia, “Sacred geometry ascribes symbolic and sacred meanings to certain geometric shapes and certain geometric proportions.” It is associated with the belief in a “divine geometer/creator” from which the physical universe is unfolding in inherently coherent and orderly ways.
One form of sacred geometry that I’ve been working with for many years is the mandala. It is defined simply as a geometric configuration of symbols. Mandalas are used in many spiritual traditions as a means of focusing attention on the inherent order and beauty of the universe. They can be used as an aid to meditation and for establishing sacred space.
My own work with mandalas has primarily involved adding color to existing mandala forms as presented in adult coloring books. I’ve described this work in detail in two of my previous blog pieces:
Finding Relaxation and Focus in Coloring Mandalas | John’s Blog
More recently, I’ve become interested in generating my own mandala templates using simple geometry. For guidance and inspiration in this process, I’m indebted to the book Islamic Geometric Patterns by Eric Broug. More than an aesthetic study of Islamic graphic motifs evident on many mosques, shrines, and other holy places, Broug’s book is an instructional guide for constructing complex Islamic-inspired designs using simply a ruler, compass, and pencils (ordinary and colored).
First Attempt
The figure below is my first attempt to create a mandala. Its geometry is relatively simple. It starts with drawing a circle with horizontal and vertical lines running through the center point. The circle intersects the vertical line above and below the center point. And the circle intersects the horizontal line to the left and right of the center point. Each of those four intersecting points then becomes the center of another circle of the same radius as the first.
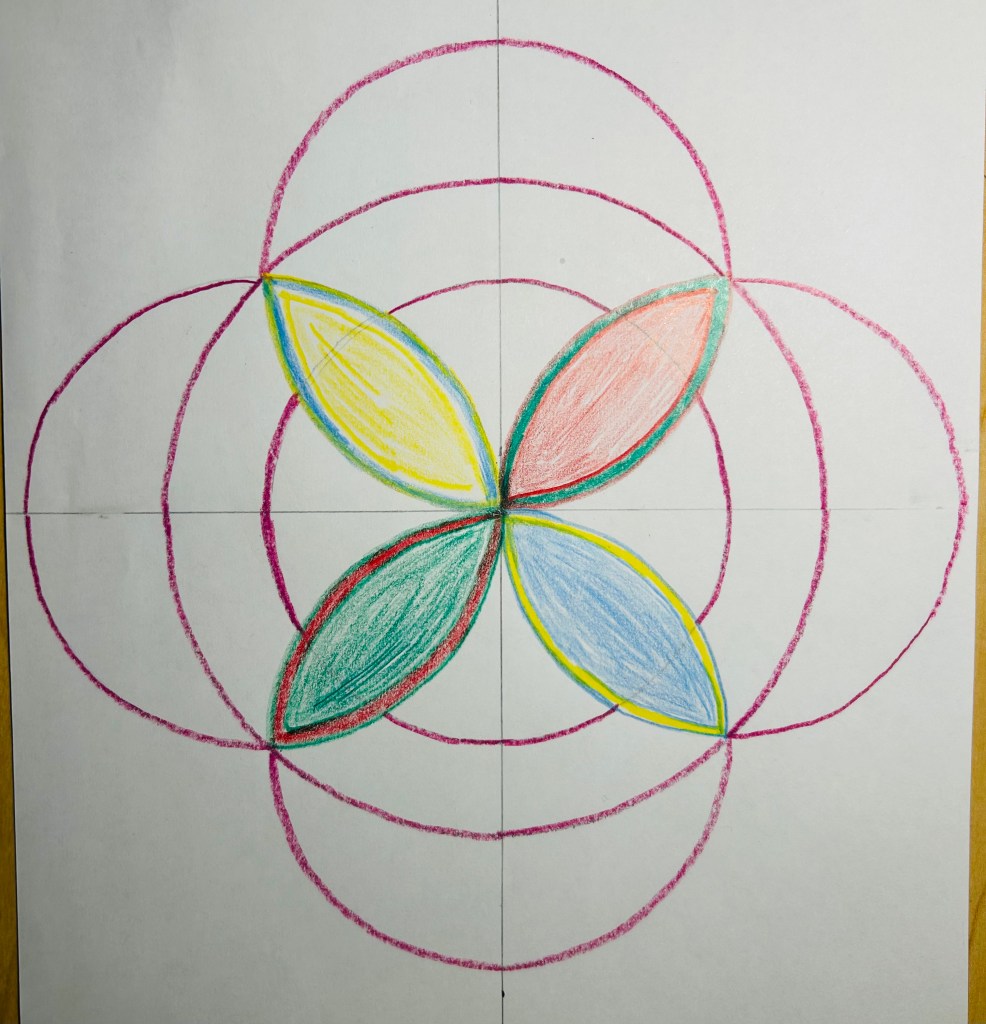
A sixth circle can then be drawn using the four intersection points of the four outer circles. I used the center of the first circle and measured (with a compass) the distance to the four outer circle intersection points. This sixth circle has a larger radius than the other five circles and is concentric with the original circle.
It took me a few attempts to get a satisfying result. After meditating on it for a bit, I decided to color in a four-petal flower pattern that emerges. I also used a red pencil to highlight the circumferences of all six circles. I was pleased with this first foray into creating a mandala.
Flower of Life
My second foray was a bit more challenging. It involves 6 same-sized circles surrounding an interior circle of equal size. I’m not going to go through the geometric steps involved in creating this here. But like the first figure, it uses intersection points created by previous steps to become the center point for the next circle. All the design is done with compass and straight edge, with no linear measurement required. The finished work is shown in the figure below.

I learned later that the basic template of this figure has been used universally since the time of the ancient Egyptians (6,000BC). It is usually referred to as the “Flower of Life”. There are various interpretations of the symbol across cultures, but a common thread is that it represents “the interconnectedness of all things, the cycle of life, and universal creation”.
This symbol also provides the basis for drawing a perfect hexagon in the center of the central circle.
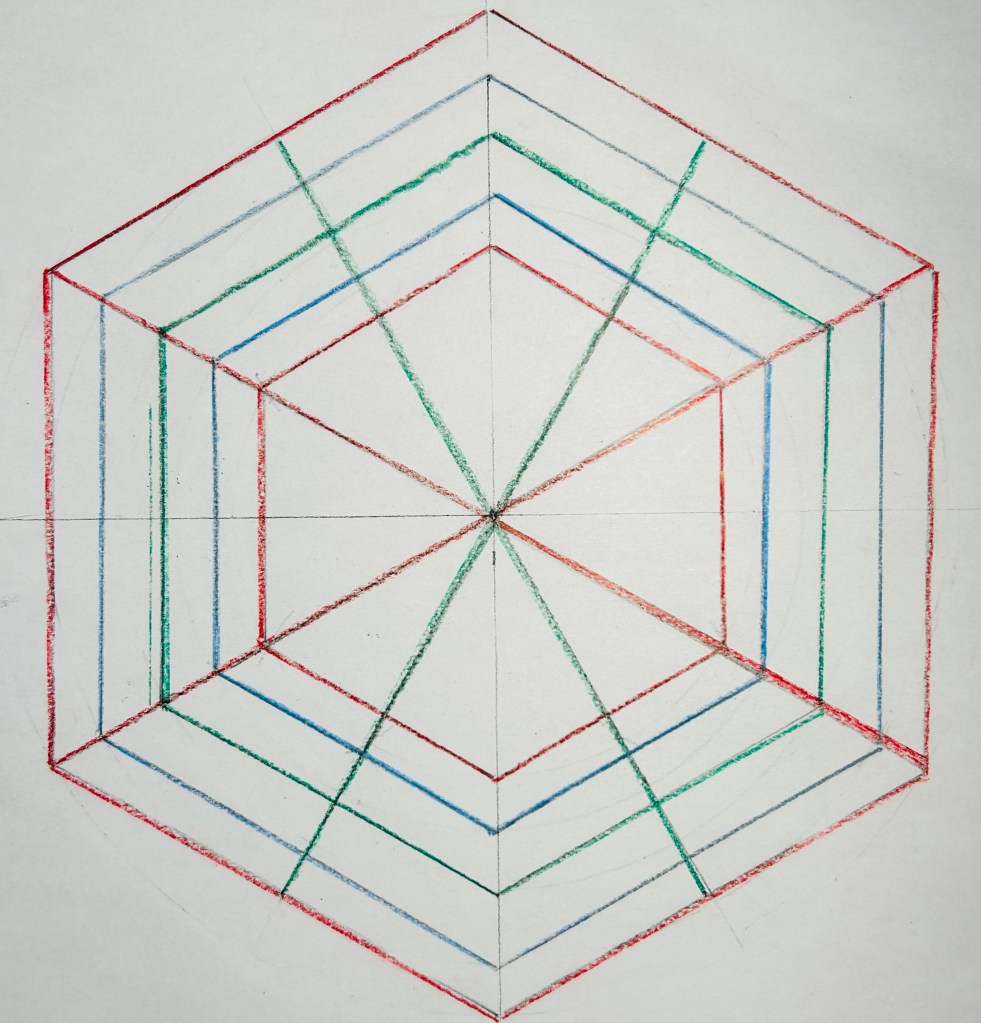
Concentric Hexagon Mandala
Using what I learned from creating the “Flower of Life”, I was able to easily construct a pattern of 5 concentric hexagons. It involved simply using a compass to draw four concentric circles around the central circle. Then the directional lines used to create the first internal hexagram are extended outward to intersect the concentric circles. The six intersection points on the circumference of each circle become the six points of the hexagon. I added a little color to highlight its mandala character.
The Great Mosque of Cordoba design template
The first real world example of an Islamic geometric pattern that I explored is based on the next complex figure.

The figure’s central motif is an 8-pointed star. The basis of the design is a circle within a square. Horizontal and vertical lines are drawn through the center of the circle, and then diagonal lines are drawn connecting the opposite corners of the square. The intersection points of the four lines crossing the circle become the points of connection for the rest of the pattern. Once the pattern is complete, some of the construction lines can be erased, yielding the following:

Tessellation
Eric Broug teaches that many of the ornate patterns of design used in the world-famous Great Mosque of Cordoba are simple repetitions of the figure given above. This repetitive process is called tessellation. The formal definition of the term is: “an arrangement of shapes closely fitted together, especially of polygons in a repeated pattern without gaps or overlapping.”
Per Mr. Broug’s suggestion, I made 9 photocopies of the figure above and assembled them together to witness the effect, shown below.

As you can see, the repetition of the original figure yields more interesting and complex patterns. Of course, the actual rendition of this in the Cordoba mosque is much more ornate.
I’m obviously still a novice at this, but I wanted to share my initial enthusiasm at discovering the fascinating realm of sacred geometry.
To be continued…
John Bayerl, 1/1/2025
